
Custom built-in desks are beautiful, but they have always been out of my price range. Fortunately, you can create an IKEA kitchen cabinet desk for a fraction of the price!
We were able to store a ton of stuff, hide our printer, computer towers, and completely transform the space for much less than custom built-ins would have been.
Table of Contents
- Step One: Build It Out With The IKEA Kitchen Planning Tool
- Step Two: Building The Cabinet Frames
- Step Three: Installing The Countertop
- Finishing Touches
- Closing Thoughts
- Follow Up Questions About Our IKEA Kitchen Cabinet Desk
Step One: Build It Out With The IKEA Kitchen Planning Tool
One advantage of working with IKEA kitchen cabinets is their planning tool – it’s a fabulous resource and will give you a great visualization of what the end result will be.
You can drag and drop cabinets, customize drawer fronts, add hardware, and see it all in a 3D render. It’s actually pretty amazing (and it runs in the browser!)
One tip: Create an account before you begin and save often. While it’s a lot more stable than it used to be, you REALLY don’t want to lose your progress because it stops responding (I know from experience!).
How To Use the IKEA Planning Tool For An IKEA Kitchen Cabinet Desk
- Start by entering your room dimensions, including any doors, windows, or obstacles (Measure at least twice!)
- Drag in the cabinets to your floor plan to give yourself a basic layout (you’ll want to use the 24″ deep ones, and I prefer those with drawers).
- Once your cabinets are placed, you can customize the interiors, add lights, change interior fittings, etc. You can even use the ‘change all at once’ tool to quickly try out different looks.
- After you are satisfied with your cabinet layout, you’ll need to add a countertop. Since most kitchens don’t have countertops without cabinets beneath them (unlike desks and offices), you’ll need to use the resizable worktop option to create the countertops for where your legs will go (see diagram below).
- Once you finish your design, you’ll be able to print out a list of every single item you’ll need. Print this out and tape it to the wall while you’re building – it’s a great way to stay organized.
- Order your cabinets online or go to a physical IKEA store to order your cabinets (more about this below). If you choose to go the in-person route, the employees will pull up your account and double-check your measurements, making sure you haven’t forgotten anything crucial.

Above is what we ended up with: this gave us two seats at our joint desk that fit exactly in our room’s nook and gave us ample storage below (I added 6 drawers on each side and a hidden computer tower/printer cabinet in the middle). I also added some glass cabinets on the top, which gave some visual lightness to the otherwise very heavy space. We ended up adding a floating shelf in the negative space between the two glass cabinets later, which gave us even more storage.
Dimensions for an IKEA Kitchen Cabinet Desk
I loved 99% of everything in this IKEA kitchen cabinet desk build, but in hindsight, the openings for our legs were a little tighter than I would have liked at only 28″ across. If you are wondering about dimensions to ensure you are comfortable, here are a few guidelines:
- Monitors should be an arm’s length away (easily achievable with standard 24″ cabinets)
- Standard desk height is 30″ – we were able to achieve that by not installing the toe kicks, but it really depends on your height (I’m 5’9″ and my husband is 6′, so 30″ worked well enough for us)
- The minimum leg room width is 24″, but we felt tight at 28″, so you may want a little more
- At least 36″ of desk width per person
There’s actually a pretty great ergonomics calculator from Ergotron that can help you decide whether or not you’ll need a keyboard tray here. I was more comfortable with one, but my husband liked to use his keyboard on the tabletop.
Should You Go Pick Up IKEA Kitchen Cabinets Or Have Them Delivered?
Once you’ve finished your design, you’re ready to order the parts necessary for your IKEA kitchen cabinet desk. This is when things can get a little tricky if you have a small car or live far away from an IKEA. For full transparency, I’ve done both over the years – gone to pick them up myself and had them delivered.
And if I had to choose between the two? Delivery, hands down. I’ve found that as long as you’ve doubled checked your measurements, the kitchen staff won’t have much input on things you could have forgotten, and the pick-up process can be gruelingly long since many of the parts aren’t available in the self-pick portion of IKEA and have to be picked by employees.
Delivery from IKEA used to be really expensive but has really come down in price over the years. That being said, if you can make a weekday trip and you’re relatively close by, it’s nice to be able to see your finishes in person and take home everything you need.
Products, What You Don’t Need, and Tools
Our IKEA Kitchen Cabinet Desk Product Shopping List:
- IKEA SEKTION Cabinet Frames in Various Sizes
- BODBYN Door Fronts (In hindsight I wish we had used something a little less expensive since desks don’t need to have the same level of durability as kitchen cabinets)
- Inexpensive Hardware From Home Depot
- MAXIMERA Drawer Slides in Various Sizes
- Butcherblock countertops (ours has since been discontinued, but here’s another version)
What You Don’t Need:
- Legs (unless you are really tall, you’ll want to install the cabinets with no toe-kick, which means no legs)
- Toe kicks (same as above)
Tools That Make Things Easier:
- A Pozidriv Drill Bit Set (These grip IKEA screws much easier than a regular Phillips, and if you have a lot of drawers, they’re a lifesaver.)
- Dremel or a hacksaw (For the metal rail the cabinets hang from, which you’ll have to cut to size…I really prefer the Dremel because the hacksaw can take a LONG time)
- A circular saw (To cut the countertop to width)
Looking for a good Dremel or circular saw? Check out my DIYer gift guide, which has my product recommendations for these tools and more!
Step Two: Building The Cabinet Frames
I’ve built IKEA cabinets quite a few times, and they are actually super easy to put together and feel incredibly sturdy. As with most things IKEA, the directions can be somewhat lacking, but there were a few tutorials that I found really helpful here, here, and here. Here’s how we built our IKEA kitchen cabinet desk:

How To Install IKEA SEKTION Base Cabinets (With No Toe Kick)
Building and IKEA kitchen cabinet desk is pretty similar to assembling cabinets for a kitchen, but there are a few key differences:
- Cut the railing to size, and attach to studs as often as possible, 5″ below the recommended height (since you aren’t using toe kicks). Alternatively, you could sit them right on the ground and put a piece of cardboard as a spacer underneath, and THEN mark where the railing should go.
- Assemble your base cabinet frames (they’re basically just boxes) and slide them into place, hanging from the metal strip you just installed.
- Install your drawer slides, working from the bottom to the top (this way you can rest the slide you are installing on the one beneath it)
- Screw any cabinets that are directly adjacent to each other together (it’s a lot easier to do this after you install the slides so you don’t accidentally use a hole to connect them that was intended for a drawer slide)
- Install your drawer fronts and cabinet doors (you’ll definitely want those Pozidriv bits for this step)

Eventually, we installed all the cabinet frames, sliders, and drawer fronts, which meant it was time to tackle the countertop. Shout out to my mom and Aaron for helping me with this project! It took about 2 days to purchase and build everything.
Step Three: Installing The Countertop

The next task in constructing our IKEA kitchen cabinet desk was cutting the butcher block countertops to size. Our particular desk was too long for one countertop but too short to fit two without cutting anything. For structural integrity, I chose to go with two of the shorter countertops with the seam right above the middle cabinet. Ours were solid oak, but are no longer available – here’s another version that has a thick veneer.
We measured, and then taped where we wanted to cut both countertops to try and minimize blowout and chipping. Then, using our circular saw, we cut each to size. Once cut, they slid in for a dry fit quite nicely.

I actually kind of liked the look of the raw wood but knew since we were going to put in dark hardwood floors someday, I wanted to stain it dark. You can also see we hung our monitors and hid the cords (the left one has skewed to one side in the picture above, but it just rotates back into place.
Here’s the mount we used, and here’s the cord hiding mechanism. Contrary to popular belief, it’s actually against code to put any sort of regular plugs behind a wall because it’s a documented fire hazard. I’m glad we spent the extra money to do it the right way.
Attaching The Two Countertop Pieces Together
We used our Kreg Jig to attach the two pieces of countertop together, which I wouldn’t recommend. Kreg attachments are great for smaller pieces of furniture, but this was way too big of an application. It worked okay, but there are definitely better ways to do it. If I could do it again, I would probably use a router to create a space to install bolts to pull them together.
Once attached to each other, we put them on some folding tables close to where the countertop would eventually rest and slid them into place, meaning they were never unsupported risking the integrity of the two pieces being put together.
Staining The Butcher Block
Finally, it was time to stain. Unfortunately, we ran into a problem. The original stain we bought was a bad batch and came out a lot more red than I had anticipated (always test a small area before you dive right in!).
I took it back to Home Depot, and they replaced it, no questions asked. I had to do another coat or two to cover up the red, but it never really went away.
I used Polyshades, and I would not recommend it. I don’t know if it was the heat (we lived in Texas), or my application process, but I was never really happy with the finish – it was splotchy and uneven, though it did provide. a nice gloss.

Finishing Touches
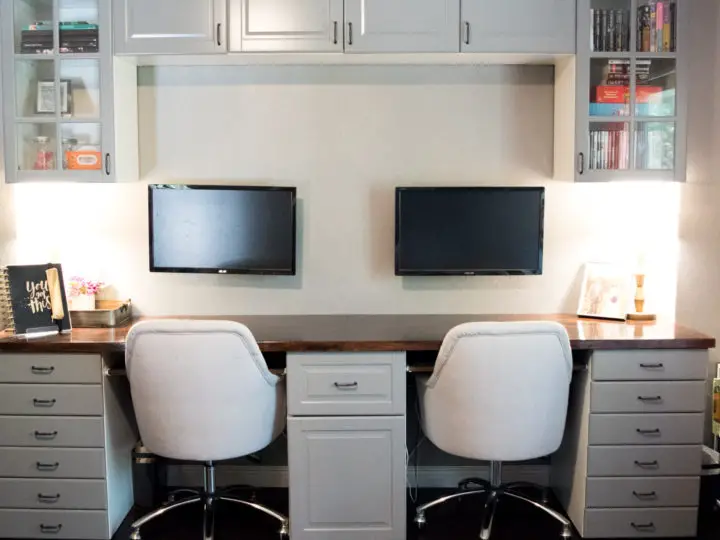
I’m very happy with how our IKEA kitchen cabinet desk turned out – it really gives the look of a custom built in desk without the higher price tag.
We added new lamps (similar), which really help with task lighting. I had originally thought about adding under cabinet lighting, but since you would be able to see it from where we were seated, I decided against it.

Hanging the monitors on the wall and routing the cables behind was one of the best decisions ever. It keeps the desk super clean, and there are no ugly cables to deal with. Everything is just tucked behind the wall, with nothing to clean or get dusty. The computer towers are hidden in the center cabinet, and we installed some extra fans in the back and keep the door open when we use them to help with the heat.

Our chairs fit wonderfully in this setup, and the keyboard trays I built work fantastically! If you want to add keyboard trays, it’s really easy:
- Add some drawer slides to the interior of the cabinet leg opening
- Stain a piece of wood to match the countertop
- Slide it into place!
I love that there’s nothing on the top of the desk, and the keyboard and mouse are tucked nicely away.

In conclusion, I’m super happy with what we accomplished. We spent less than $2000 for a custom look and sturdy, beautiful built-in cabinets. I would absolutely do it again, and really feel like we’ve gotten our money’s worth out of the investment.
Closing Thoughts
Price and Value
This entire project came in at around $2,000, which was less than I was quoted for custom built in cabinets, but we could definitely had done it for less. If I could do it again, I would:
- Keep the more expensive drawer slides, but add a few different heights so taller items could fit, too. This would keep costs down since each individual drawer needs slides and fronts to match. Fewer drawers = cheaper.
- Choose less expensive drawer fronts. The grey enamel was a great look, but I would probably go for something less expensive and more simple.
- The butcher block countertop was wonderful and definitely worth the extra cost of a solid wood.
Quality and Durability
These cabinets, and the desk in general, are/is rock solid. Toddlers ran into it, dogs scratched at it, etc, and nothing could damage them. I think they are much higher quality than what you can get in pre-assembled and unassembled cabinets at other big box retailers.
The drawer slides are particularly wonderful – being able to slide them out to fully see the contents has been wonderful, and they feel incredibly sturdy. Plus soft-close…enough said.
Would I Build An IKEA Kitchen Cabinet Desk Again?
Absolutely. I love the look of this desk, and am thrilled with how durable and sturdy everything has been. Like I mentioned, I might tweak a few things like the drawer fronts and the finish I used on the countertop, but I would absolutely build an IKEA kitchen cabinet desk again.
Follow Up Questions About Our IKEA Kitchen Cabinet Desk
It’s been several years since we installed these, and you guys have had some great questions!
“Did you put feet on the base cabinets?”
Great question! We did not put feet on the base of the cabinets, nor a toe kick, which made the desk more comfortable for sitting. I will say we used keyboard trays, and both my husband and I are tall, so this setup may not work for everyone.
“Is it desk height or counter height?”
Desk height! It’s roughly 30″ tall, and we made up for the extra height with keyboard trays to make everything more ergonomic.
“Where did you end up hiding your computer towers?“
They are actually in the largest middle cabinet at the bottom – we just bought small/mid-size towers and measured carefully to make sure they would fit. There isn’t a ton of ventilation room, but we installed fans in the back of the cabinet box and it has worked just fine!
“Did you remove the baseboards behind the cabinets? If not, was it easy to mount them to the rail on the wall?“
IKEA actually puts special spacers in their kits to make sure the cabinets are plumb with the wall since they would naturally be held partially away at the top due to the rail. It depends on your baseboards, but I would say you’ll get a more built-in look if you remove them.
Let me know if you have any other questions about this project – I would love to help in any way I can!
DG
Sunday 19th of February 2023
Did the doors catch on the floor/carpet since you didn't have the toe kicks installed?
Catherine
Friday 24th of February 2023
Nope, not at all! If you hang them high enough on the wall, they just glide right over the carpet.
Tim
Monday 11th of July 2022
Looking at doing something similar. Do the doors scrape the ground at all without the toe kick? Did you put anything under the cabinet to elevate it slightly so the door did not rub on the floor?
Catherine
Tuesday 12th of July 2022
Hi Tim!
Thankfully the doors didn't scrape on the ground at all. We hung the metal rail that held the cabinets to the wall just a smidge higher to keep them from resting completely on the ground (.25" or less), and opening/closing had no issues.
AllisonA
Monday 4th of January 2021
I am loving those office chairs!! Can you link where to find them?
Catherine
Monday 4th of January 2021
Hi Allison!
The chairs were from PB Teen of all places! https://www.pbteen.com/products/tufted-desk-chair/?pkey=s%7Coffice%20chair%7C39
In full transparency, they were AWFULLY uncomfortable, but they looked pretty. I did find you a similar one from Amazon, though! https://amzn.to/2X9Nm5A It seems to be really comfortable and has a similar look (with much better reviews!)
Hope that helps! :)
Will
Sunday 13th of December 2020
Nice Desk! The trick w/ IKEA is to get a pozidriv screwdriver. It has a extra wings and works much better than a standard phillips head on the IKEA screws.
Catherine
Wednesday 30th of December 2020
Noted! We've built another IKEA kitchen since this build, and I wish I had known that then! When we redo our new kitchen, I'll be sure to pick one up. Thanks for the tip!
Maria
Saturday 18th of July 2020
Did you put feet on the base cabinets? Is it desk height or counter height? I apologize if I missed It in the post or comments. Thanks :)
Catherine
Thursday 13th of August 2020
Great question! We did not put feet on the base of the cabinets, nor a toe kick, which made the desk more comfortable for sitting. I will say we used keyboard trays, and both my husband and I are tall, so this setup may not work for everyone.