
Hanging gallery walls can be difficult without the right tools – I vividly remember trying to get three pictures hung perfectly above our bed in our first apartment with just a tape measure, a comically small level, and a pencil. We got it done, but it took a long time and a LOT of math. So what’s a better solution? And is there a tool out there that makes hanging a gallery wall effortless? The good news is yes, there is!
The best gallery wall tool is a self-leveling laser level. While there are gadgets out that will make the process easier than relying on a handheld level, if you are working over long distances or need an extra set of hands, laser levels are far superior.
But how do you use a laser level? And with as many laser levels there are on the market, which one is right for you? Read on to find out!

Why Self-Leveling Laser Levels Are The Ultimate Gallery Wall Tool
This was the first time I’ve ever hung a gallery wall with a laser level, and let me tell you…I’m never going back to my handheld solutions.
The entire project took me maybe five minutes max, and that’s with me photographing (+shoving my laundry piles out of the GIF above). Without a laser level (or if I had used another gallery wall tool), this would have taken 20+ minutes, and I probably would have roped my husband into helping just for an extra hand or two.
All I did to hang these three pictures evenly and perfectly level was:
- Find the distance between my dresser and my door (in this case it was 106″)
- Find the exact center of that 106″ expanse – which I then scooted the laser level onto so it could mark my place. It also gave me the opportunity to step back and visually double-check that everything looked right.

- Find the center of half of that 106″ expanse, and use the laser level to mark my place. Hammer the picture hangers along the level line into the wall.
- Hang my pictures!
The speed at which I was able to finish this project still blows me away – I can’t believe I was able to hang these three photos so quickly and effortlessly.
You could definitely get the same project done with a less expensive laser that doesn’t have the extra features like multiple lines, extra batteries, 360° lines, etc, but I really appreciated being able to know exactly where I need to hammer. When you paint your walls as dark as I did – that really matters!
The Problem With Other Picture Hanging Gadgets
If you walk the aisles of Home Depot, Lowes, or even scroll through a search for ‘gallery wall tool’, you’ve probably seen various combinations of slides, rulers, levels, and hooks. These gadgets can be really useful, but they’re typically one-trick ponies.
If you’re old enough to remember Alton Brown’s cooking show Good Eats, you might remember him talking about how every tool in your kitchen should serve no less than three purposes. I go by the same rule with tools, when possible.
In other words, while these picture-hanging gadgets will probably make the job easier than trying to do things by hand, that’s pretty much all they’ll do. On the other hand, a laser level has a multitude of uses and even if it’s a bit more expensive, will be a better bang for your buck since it’s multifunctional.

Should You Buy A Laser Level JUST For Hanging A Gallery Wall?
Absolutely not – buying a laser level just to hang a gallery wall is completely overkill. But if you’re a DIYer like me, a laser level can be an incredibly useful tool for your toolbelt.
My biggest reason for investing in a laser level is for those times that you just don’t have a level long enough or enough hands to hold the level while you’re hammering, marking, etc.
Now, if you have money to burn and want to take the plunge just for hanging a gallery wall, go for it! You’ll make that money back over time as you use your laser level for other projects.
Here are a few ways I could see myself using this laser level in the future:
- Hanging multiple pieces of art level with each other on multiple walls
- Installing cabinet hardware
- Laying tile
- Checking wooden boards for warping
- Hanging wallpaper
- Hanging cabinets
- Painting stripes, lines, or anything geometric
- Hanging shelves
- Framing walls
- Finding high and low spots in my walls and flooring
- Installing doors or windows
- Installing mirrors
Are Self-Leveling Laser Levels Worth It?
When compared to manually-leveled laser levels, 100% yes – it takes what can be a very tedious process and turns it into something incredibly quick and effortless.
And compared to holding a level by hand, 1,000% yes. I don’t think I’ll be reaching for my trusty 3ft red plastic level nearly as often now that I own this Kaiweets KT360A.
Before this project, I hadn’t had the opportunity to use a self-leveling laser level, and I think this project probably took me a third of the time that it would have if I had used a manually leveled laser (which is still probably 10x faster than doing it with a handheld level).
That time saved alone makes it worth it to me. With two little ones running around and a demanding business of my own, my time to work on home projects is very limited!

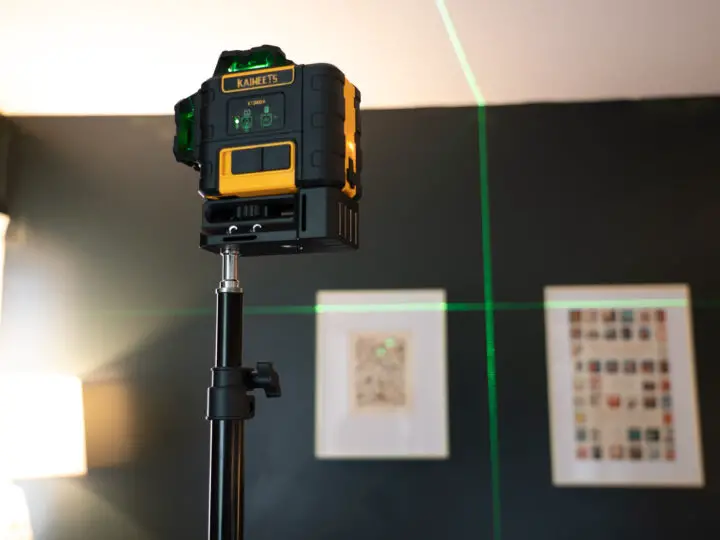
My Thoughts On The Kaiweets KT360A Self-Leveling Laser Level
I was gifted the KT360A from Kaiweets to review for this post, and I have been blown away by the quality. This particular model has the features of a $500-$600 tool for around $200.
The laser was very bright, the two USB-C rechargeable batteries (with an included charging brick, no less!) lasted a long time, the self-leveling feature was spot-on, and the different modes were extremely helpful.
I was even impressed with the packaging, shipping, and the carrying case the laser level came with. The laser and all of it’s accessories have their very own foam cutouts to sit in, making sure it will be well protected during any transportation. Everything about my experience with the KT360A was top-notch.

The only thing that wasn’t included in the box was a tripod, which I completely understand since every user is going to have their own height needs. I happened to have a light stand lying around (which I use to film videos for clients and for my YouTube channel), but if you don’t, they are very inexpensive and can really improve the usability of the laser.
This particular laser level accepts both 1/4″ and 1/8″ threads, so there’s no specialty equipment to buy if you don’t want to.
In case you’re looking for a tripod to go with this particular laser level, this inexpensive option is great if you only need to get up to 50″ or so. If you need something taller, I’d say go with an inexpensive light stand like the one I grabbed.
Kaiweets also sells a great tripod with a telescoping rod that would be super handy if you needed to easily measure your distance from the ground (I kind of want one, honestly!).
There is an included magnetic bracket too, but since I didn’t have anything metal to grab onto in this particular case, a tripod was still the best way to go.
Who Shouldn’t Buy the KT360A Self-Leveling Laser Level?
If I was a professional contractor that needed to make sure my tools performed 100% of the time both indoors and outdoors after being jostled around in a work truck, AND I didn’t want to mess with multiple types of batteries, this may not be the tool that I choose. But since I’m a DIYer and I tend to be pretty careful and gentle with my tools, this Kaiweets KT360A is perfect for me!
I talk more about why I’m an avid purchaser of budget-friendly tools in this blog post all about why I love Ryobi, in case you’d like to learn more about my philosophy on that – including my go-to tool brands.
The biggest downfall of this particular laser level was its usability outside. It’s really hard to photograph, but I lost the laser after about 10-15 ft in daylight. For me, that’s no big deal, but if you’re consistently working in daylight-level ambient light, this is probably not the right product for you.
I will say there is a laser detector that works with this particular unit that extends the working range up to 196ft/60m in bright conditions, but I wasn’t able to test it out.

Overall, I’m super happy with both the KT360A Laser Level and my simple gallery wall project. This particular wall has been blank since we moved in, and our bedroom feels so much more complete now! I’m thrilled that I get to wake up every day and look at some sentimental and beautiful art pieces because of an easy project and a great tool.

So tell me – have you ever used a laser level to hang a gallery wall? Do you even own one? Would you consider picking one like the KT360A up after reading this post?
If you do, be sure to send me some photos of the projects you tackle with it! I’d love to see! You can reach me on Instagram, or at catherine@diywithoutfear.com. Until the next project!
Geri
Sunday 16th of July 2023
Hi Catherine. I wasn't able to find DIYWithoutFear on Instagram. Message comes up that says the account page is gone or link not working. Are you no longer on that platform? I read your post about putting wood floors on a slab -- I"m considering/dreaming about doing that -- and have just a few questions I wanted to ask you. Hope to hear from you so I know where to find you in addition to your blog. thanks/gerir
Catherine
Monday 17th of July 2023
Hi!
Unfortunately, real life took over and I haven't been able to be active on Instagram - feel free to email me at catherine@diywithoutfear.com with any questions!